10% from TpT using Code: B1T1S
up to 20% many sellers!
=Up to 30% off!
Click here to see many current participants!
August 1-6th!

Sunday, July 31, 2011
Thursday, July 28, 2011
How do you set up your classroom library?
It's that time of year again, when you take all that you have read and learned over the summer and you are ready to apply to a fresh new school year. Every year we teachers try to improve from the previous year... Perhaps its discipline, or math strategies, or you want more hands on activities to reach those kinesthetic kiddos. Today, we will be discussing the classroom library.

It's great to utilize your school library but sometimes you just don't have the time to send everyone (our older elementary don't get an assigned library period after the first four weeks of school unfortunately), they don't have the books the kids wanted or because they are rushed the students don't choose quality books. When rushed with a 5 minute window, there is little time to choose quality interesting books. They usually grab the first book in their level and rush to check it out.

Thus the importance of a classroom library. Whether you are a kinder teacher or teaching in high school, reading will always be a part of our jobs. There is a 100% chance you will recieve at least one student who fell through the cracks, was moved around too much, or just didn't get the help they needed in time and they are coming to you lacking something that will devastatingly affect them in the future. Unfortunately with state standards and having so much on our plate already, it is a hard road but one we have dedicated our lives to paving for those generations below us.
One tool that can be used to reach our students is the classroom library. The following are some hints, tips, suggestions, activities etc... that you could use for your library!
 Have a clear label with the reading level (and AR points if your school participates in this program)
You can have your library organized by reading level, author, title... just make sure your students understand how it is organized so they can utilize it quickly without frustration.
If you have your students participating in book clubs or reading workshops, you can have students discuss books that they have finished in front of the class so that other students may be exposed to books they may not have chosen on their own.
You could have a spotlight area for each genre, where you choose one book from each genre that the students can read and earn. You could possibly set up a tic tac toe board or some other incentive they can fill up as they finish the different genres.
Have specific times when students will be visiting the library. This way they will know what to expect and be ready to make clear choices. They could also have a list of books they are interested in when heading to the library.
Use card stock cut into wide strips as book placement holders. Have kids decorate the books with their names and pictures that represent them. When they check out a book from the class library, they will place their holder where the book belongs. This way, you can quickly see who has a book and the student can quickly see where to return it when done reading it.
Having a class job of librarian can help keep your library organized and cared for.
Have a bulletin near the library prepped for response cards from books that have been read. This could be another way to expose students to unfamiliar books as well as help lower readers see examples of how to review a book.
So, I know many of you seasons veteran heroes or fresh out of college superstars have some great ideas as well! Please leave a comment below and share! You just might inspire someone! :)
Check out this amazing blog for some great pictures of classroom libraries from actual classroom! ClutterFree Classroom Blog

It's great to utilize your school library but sometimes you just don't have the time to send everyone (our older elementary don't get an assigned library period after the first four weeks of school unfortunately), they don't have the books the kids wanted or because they are rushed the students don't choose quality books. When rushed with a 5 minute window, there is little time to choose quality interesting books. They usually grab the first book in their level and rush to check it out.

Thus the importance of a classroom library. Whether you are a kinder teacher or teaching in high school, reading will always be a part of our jobs. There is a 100% chance you will recieve at least one student who fell through the cracks, was moved around too much, or just didn't get the help they needed in time and they are coming to you lacking something that will devastatingly affect them in the future. Unfortunately with state standards and having so much on our plate already, it is a hard road but one we have dedicated our lives to paving for those generations below us.
One tool that can be used to reach our students is the classroom library. The following are some hints, tips, suggestions, activities etc... that you could use for your library!
 Have a clear label with the reading level (and AR points if your school participates in this program) You can have your library organized by reading level, author, title... just make sure your students understand how it is organized so they can utilize it quickly without frustration. If you have your students participating in book clubs or reading workshops, you can have students discuss books that they have finished in front of the class so that other students may be exposed to books they may not have chosen on their own. You could have a spotlight area for each genre, where you choose one book from each genre that the students can read and earn. You could possibly set up a tic tac toe board or some other incentive they can fill up as they finish the different genres. Have specific times when students will be visiting the library. This way they will know what to expect and be ready to make clear choices. They could also have a list of books they are interested in when heading to the library. Use card stock cut into wide strips as book placement holders. Have kids decorate the books with their names and pictures that represent them. When they check out a book from the class library, they will place their holder where the book belongs. This way, you can quickly see who has a book and the student can quickly see where to return it when done reading it. Having a class job of librarian can help keep your library organized and cared for. Have a bulletin near the library prepped for response cards from books that have been read. This could be another way to expose students to unfamiliar books as well as help lower readers see examples of how to review a book.
So, I know many of you seasons veteran heroes or fresh out of college superstars have some great ideas as well! Please leave a comment below and share! You just might inspire someone! :)
Check out this amazing blog for some great pictures of classroom libraries from actual classroom! ClutterFree Classroom Blog
Tuesday, July 26, 2011
Creating a Podcast of GarageBand Pt. 2
Okay, so you have an idea how to get around the program. I will now show you some ways to make a simple podcast. Later posts will have other tricks and tips along the way AND if you have any that you have discovered PLEASE share! We teachers always love a good learning experience! :)
For this post I am going to assume that you want to create a podcast where there is talking involved and background music with sound effects... sound good? :)
So, your program should look something like this (maybe minus the media browser)
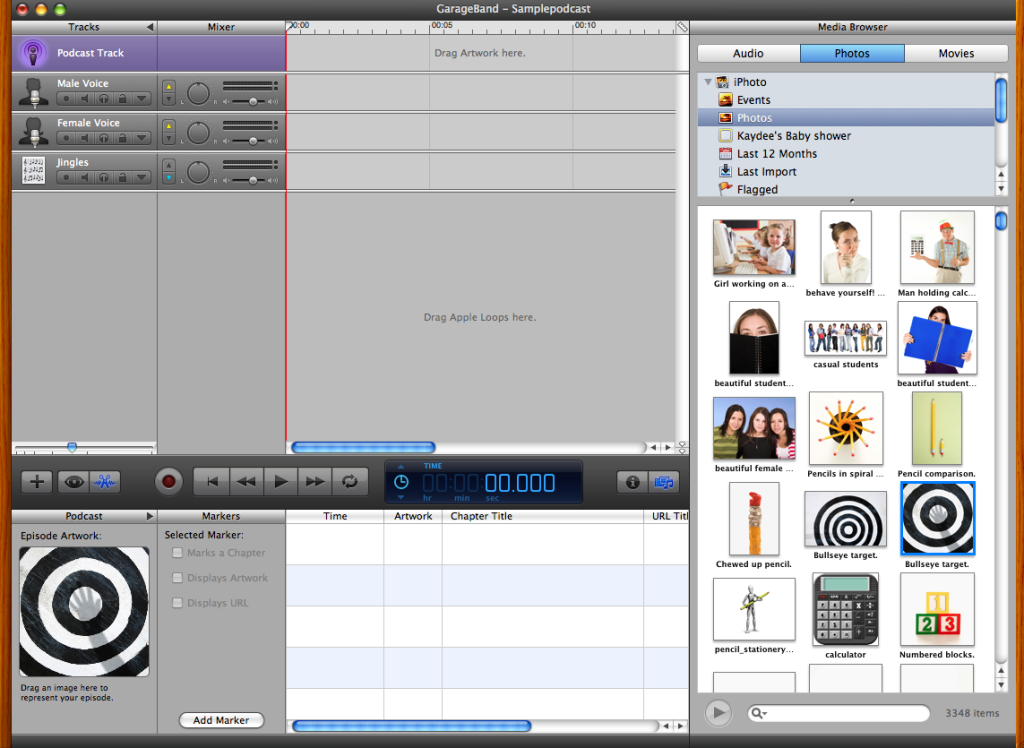
If not, head back to part one and get caught up! :) (We'll wait for you)
Now, there are two easy ways to get your voice into this program. If your computer has a microphone installed within, if not, you will need to buy a USB microphone then you will be able to record straight from Garageband. You can also drag mp3 or wav files if you have recorded them elsewhere using another recording software or pulled music off of a CD or website.
Step 1: (If you are using a microphone) Click on the male or female voice depending on where you would like the recording to go. Whichever gray tab is clicked, that is where the recording will go so be aware of that so you have the correct one set before recording. Make sure the first button with a circle is selected and red (this enables recording).
Step 1: (if using a file) Click on the media button from the center panel. This will show your media browser. Click on Audio. Make sure your song has been downloaded into one of the available choices (ITunes works well). Find your song or file name.
Step 2: (Microphone) When you are ready, click on the record button from the center panel. It will begin recording immediately. Any sounds in the background will be picked up as well if they are too loud so be aware of this. Once you are done recording, hit the record button again. If the player continues to play (the red line keeps moving) just hit the play arrow to stop it. You will see a purple box with sound visuals. You may drag this box left and right to place where you want the sound to begin.
*Note: Wherever the red line is located is where the recording will begin. Grab the arrow attached to the red line at the top and move it left to right and place it where you would like the next recording to go!
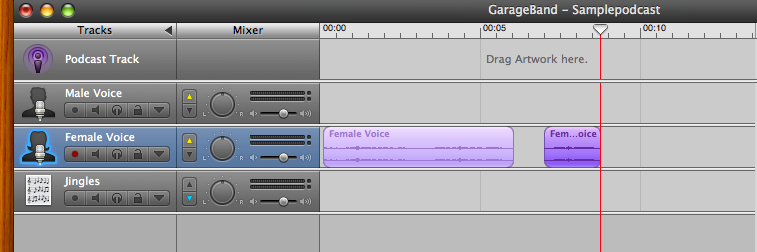
Step 2: (File) Click on the file name and drag it where you want the sound to go. You can layer sounds with garageband. I will place my file name in the Male Voice to layer with the female.
* Note: If there is a recording or file running in a tab at the same place where you want to make a recording you must mute the other sound first or it will be playing while you are trying to record. The mute button is the megaphone icon next to the headphones. It will white out the music until you click mute again.
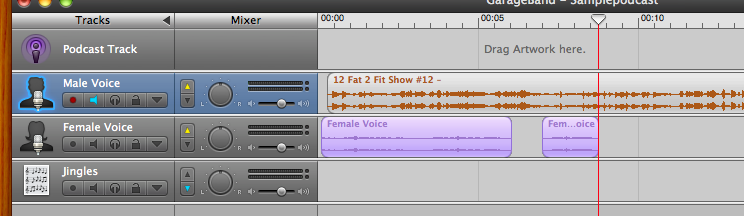
See how the background in the Male Voice is not purple but white? The megaphone is lit up blue showing it is in mute. Now I can continue to record on Female Voice without it being disturbed with the file above. Once I unmute the Male Voice and push play from the beginning, the two will play at the same time.
If you want background music that is not from ITunes: Click on the Eye icon in the center panel. Find a Jingle that suits you and then click and drag into the Jingles tab. If you want to add sound effects like glass breaking or people talking, click on stingers or sound effects and then click and drag.
Important to Remember! (to save you brain frustration!)
* Make sure you have clicked on the tab you plan to record in or you drag to the correct tab.
* Make sure the red line is placed exactly where you wish the recording to start!
* If you drag or record over a sound already there it will replace it. Moving it will not fix the problem. Edit - Undo will be your friend there.
* Mute layered tracks before recording so you don't record those in the background.
Now that you know how to get sounds on there... let's talk about how to edit them.

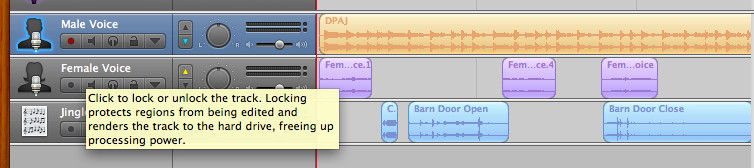
You can see where I have split the section into three and now have the middle section ready to delete.
When you are done, your podcast will look like a layer of sounds. In the picture below I have a background song playing on my Male Voice. I have click the down arrow in the panel to make it not a main track. I have my voice recordings in Female Voice. I also have added some sound effects from the Eye Icon. I have a camera shutter and then later a Barn door opening and then closing.
Play around with these simple tools and you too can create a real podcast!!
Oh, one last thing before we go! You want to know how to save it right?? :)
Once you have it just as you want it: Click on the Share tab on the top toolbar.Then click on Export to Disk. It will bring up an mp3 decoder. Then click Export.Name and then choose the location and Save! You now have an mp3 you can play in any ipod or mp3 player! Pretty cool huh? :)
For this post I am going to assume that you want to create a podcast where there is talking involved and background music with sound effects... sound good? :)
So, your program should look something like this (maybe minus the media browser)

If not, head back to part one and get caught up! :) (We'll wait for you)
Now, there are two easy ways to get your voice into this program. If your computer has a microphone installed within, if not, you will need to buy a USB microphone then you will be able to record straight from Garageband. You can also drag mp3 or wav files if you have recorded them elsewhere using another recording software or pulled music off of a CD or website.
Step 1: (If you are using a microphone) Click on the male or female voice depending on where you would like the recording to go. Whichever gray tab is clicked, that is where the recording will go so be aware of that so you have the correct one set before recording. Make sure the first button with a circle is selected and red (this enables recording).
Step 1: (if using a file) Click on the media button from the center panel. This will show your media browser. Click on Audio. Make sure your song has been downloaded into one of the available choices (ITunes works well). Find your song or file name.
Step 2: (Microphone) When you are ready, click on the record button from the center panel. It will begin recording immediately. Any sounds in the background will be picked up as well if they are too loud so be aware of this. Once you are done recording, hit the record button again. If the player continues to play (the red line keeps moving) just hit the play arrow to stop it. You will see a purple box with sound visuals. You may drag this box left and right to place where you want the sound to begin.
*Note: Wherever the red line is located is where the recording will begin. Grab the arrow attached to the red line at the top and move it left to right and place it where you would like the next recording to go!

Step 2: (File) Click on the file name and drag it where you want the sound to go. You can layer sounds with garageband. I will place my file name in the Male Voice to layer with the female.
* Note: If there is a recording or file running in a tab at the same place where you want to make a recording you must mute the other sound first or it will be playing while you are trying to record. The mute button is the megaphone icon next to the headphones. It will white out the music until you click mute again.

See how the background in the Male Voice is not purple but white? The megaphone is lit up blue showing it is in mute. Now I can continue to record on Female Voice without it being disturbed with the file above. Once I unmute the Male Voice and push play from the beginning, the two will play at the same time.
If you want background music that is not from ITunes: Click on the Eye icon in the center panel. Find a Jingle that suits you and then click and drag into the Jingles tab. If you want to add sound effects like glass breaking or people talking, click on stingers or sound effects and then click and drag.
Important to Remember! (to save you brain frustration!)
* Make sure you have clicked on the tab you plan to record in or you drag to the correct tab.
* Make sure the red line is placed exactly where you wish the recording to start!
* If you drag or record over a sound already there it will replace it. Moving it will not fix the problem. Edit - Undo will be your friend there.
* Mute layered tracks before recording so you don't record those in the background.
Now that you know how to get sounds on there... let's talk about how to edit them.
- 1. If you have a sound you no longer need: click on just that section of sound. Go to Edit - Delete.
- 2. If you only want a part of the sound removed (say you laughed by accident and want to delete only the laugh) place the red line at the beginning of where you want to delete. Make sure that selection has been clicked and is dark purple. Click Edit - Split. This will cause a split and make it two sections instead of one. Move the red line to the end of where you want to delete. Go to Edit - Split. Now you have the part you want to delete separate from the good recordings. Click off of them all so that they are all light purple. Then click on just the part you want to delete (should go dark purple) then Edit - Delete. If you do not click off the other sections it will just delete everything in dark purple.

You can see where I have split the section into three and now have the middle section ready to delete.
When you are done, your podcast will look like a layer of sounds. In the picture below I have a background song playing on my Male Voice. I have click the down arrow in the panel to make it not a main track. I have my voice recordings in Female Voice. I also have added some sound effects from the Eye Icon. I have a camera shutter and then later a Barn door opening and then closing.
Play around with these simple tools and you too can create a real podcast!!

Oh, one last thing before we go! You want to know how to save it right?? :)
Once you have it just as you want it: Click on the Share tab on the top toolbar.Then click on Export to Disk. It will bring up an mp3 decoder. Then click Export.Name and then choose the location and Save! You now have an mp3 you can play in any ipod or mp3 player! Pretty cool huh? :)
Sunday, July 24, 2011
Garage Band... Get to Know the Basics!
Now I am no wizard on Garage Band and actually there are probably a ton of tricks this semi-novice doesn't even know about... but... if you are just starting out than this will help you get your feet running. There are multiple videos and tutorials on the internet that can guide you through if you still have questions after this tutorial. Thanks! :)
* Garage Band is only for MAC, just so you know. This tutorial is for Garage Band '08 so I am not sure how different '11 may be. (Look into iLife '11)
1. When you first open Garage Band you will be given some options. Choose either the Create New Podcast Episode or Open an Existing Project (if you have already been working on one).

2. In the 'Save As' box, give your project a name and then choose a location for it to be saved.
3. When the program opens it will look like this: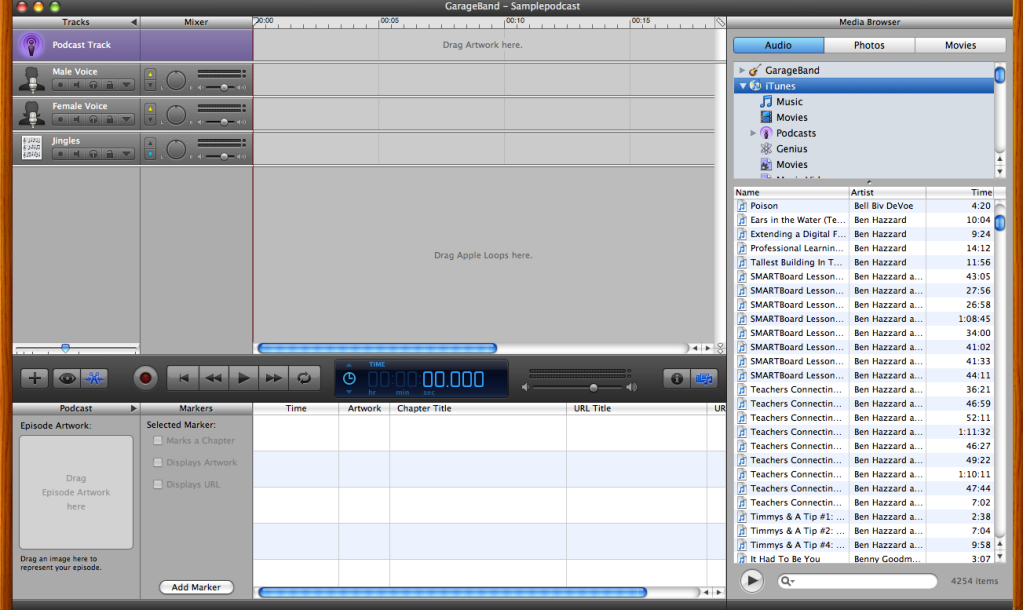
In the top left you will see 4 colored bars (one purple and 3 gray). The podcast track can be used to add pictures to your work. I honestly haven't used this feature very successfully and have much better success with iMovie when I want this accomplished. Just being honest :) But when you click on the podcast track, at the bottom right there will be a square where you can drag a photo and it will show during the podcast (kind of like when you play a song and the band cover shows the whole time) In this same area (lower screen) you can create chapters. There will be a column titled 'markers'. Click the 'add marker' button whenever you are ready for a new chapter to start. It will show the time, you can add a picture for that chapter, and name the title.
There is a male voice and female voice bar. These will be where you record yourself talking or insert a wav or mp3 with someone talking. The jingles bar is there for background music and sound effects.
To the right of the bar names you will see what looks like a control panel. There are two arrows, one pointing up and the other pointing down. If the arrow is clicked to point up, it will be a main track. If the arrow is pointing down then it's volume will go much lower should a main track be playing at the same time.
You can alter speaker direction from left to right and volume from this control panel. The two dark lines above the volume will show you the sound coming through your microphone. Try to keep it from going in the red to prevent distortion.
The light gray boxes to the right are where you will place or record your tracks. (more on that in a bit)
Keep going to the right and you will see a huge column titled "media browser." This is where you can pull audio clips, photos and even movies and place them into your tracks. Audio inserts mainly from ITunes.
Look in the lower middle of the screen and you will see a dark gray panel with some important icons.

The "+" button will add another track below the jingles track. You can choose software instrument if you plan on creating a track with individual instruments (not really what I used ever), or Real Instrument Track for recording your voice or adding wavs and mp3 (yes, thank you!)
The eye button will open up your jingles and sound effects. Play around and find ones that fit your purpose. They will show name and the length of the sound. Once you have found one you life, click on the name and drag it to the jingles track. It will form a box in the jingles track. This box can be dragged to any place in the project.

Be aware that if you drag a sound over another one, it will replace the old sound. If this happens you will need to go to edit in the toolbar and then click on undo. Moving the sound only will not fix the problem. Keep this in mind, especially once you have voice recordings involved.
The electric scissors looking button takes the lower panel out of view.
Next buttons are your: record, move to very beginning of project, move to an earlier place in project, play, fast forward, and repeat ( will make a yellow bar at the very time which can be moved, shortened or lengthened. What falls under the yellow bar will be repeated)
Next, the project time is shown down to the thousandths of a second.
The last two buttons pull up the project info or your media browser. Click one twice and the whole info or media browser is out of view. Click again to make them reappear. Under the info button, you will find different sounds for altering your voice. The podcasting and vocals under the Real Instrument tab will be most helpful.
The top toolbar will come in handy while creating your project. File, Edit, Track, and Share will be used the most. I will cover those in the next post!
So, now you at least know your general way around the program... In the next post we will discuss how to go about making a recording! See you there!
* Garage Band is only for MAC, just so you know. This tutorial is for Garage Band '08 so I am not sure how different '11 may be. (Look into iLife '11)
1. When you first open Garage Band you will be given some options. Choose either the Create New Podcast Episode or Open an Existing Project (if you have already been working on one).

2. In the 'Save As' box, give your project a name and then choose a location for it to be saved.
3. When the program opens it will look like this:

In the top left you will see 4 colored bars (one purple and 3 gray). The podcast track can be used to add pictures to your work. I honestly haven't used this feature very successfully and have much better success with iMovie when I want this accomplished. Just being honest :) But when you click on the podcast track, at the bottom right there will be a square where you can drag a photo and it will show during the podcast (kind of like when you play a song and the band cover shows the whole time) In this same area (lower screen) you can create chapters. There will be a column titled 'markers'. Click the 'add marker' button whenever you are ready for a new chapter to start. It will show the time, you can add a picture for that chapter, and name the title.
There is a male voice and female voice bar. These will be where you record yourself talking or insert a wav or mp3 with someone talking. The jingles bar is there for background music and sound effects.
To the right of the bar names you will see what looks like a control panel. There are two arrows, one pointing up and the other pointing down. If the arrow is clicked to point up, it will be a main track. If the arrow is pointing down then it's volume will go much lower should a main track be playing at the same time.
You can alter speaker direction from left to right and volume from this control panel. The two dark lines above the volume will show you the sound coming through your microphone. Try to keep it from going in the red to prevent distortion.
The light gray boxes to the right are where you will place or record your tracks. (more on that in a bit)
Keep going to the right and you will see a huge column titled "media browser." This is where you can pull audio clips, photos and even movies and place them into your tracks. Audio inserts mainly from ITunes.
Look in the lower middle of the screen and you will see a dark gray panel with some important icons.

The "+" button will add another track below the jingles track. You can choose software instrument if you plan on creating a track with individual instruments (not really what I used ever), or Real Instrument Track for recording your voice or adding wavs and mp3 (yes, thank you!)
The eye button will open up your jingles and sound effects. Play around and find ones that fit your purpose. They will show name and the length of the sound. Once you have found one you life, click on the name and drag it to the jingles track. It will form a box in the jingles track. This box can be dragged to any place in the project.

Be aware that if you drag a sound over another one, it will replace the old sound. If this happens you will need to go to edit in the toolbar and then click on undo. Moving the sound only will not fix the problem. Keep this in mind, especially once you have voice recordings involved.
The electric scissors looking button takes the lower panel out of view.
Next buttons are your: record, move to very beginning of project, move to an earlier place in project, play, fast forward, and repeat ( will make a yellow bar at the very time which can be moved, shortened or lengthened. What falls under the yellow bar will be repeated)
Next, the project time is shown down to the thousandths of a second.
The last two buttons pull up the project info or your media browser.
 Click one twice and the whole info or media browser is out of view. Click again to make them reappear. Under the info button, you will find different sounds for altering your voice. The podcasting and vocals under the Real Instrument tab will be most helpful.
The top toolbar will come in handy while creating your project. File, Edit, Track, and Share will be used the most. I will cover those in the next post!
So, now you at least know your general way around the program... In the next post we will discuss how to go about making a recording! See you there!
Saturday, July 23, 2011
Ghost Riding? Really?
I was just introduced to the new rave that apparently I had been overlooking. Based on the Song Ghost Ride the Whip by Mistah Fab, teenagers all over are leaving their cars in drive and letting them coast down the street as the drivers and passengers dance alongside the vehicle....
Maybe I'm just getting older... but... really?
Aren't teenage drivers scary enough on the road??
If you haven't had the pleasure yet then YouTube has plenty of videos to keep you busy.
There has to be a parallel here...Having a great time but no "driver" behind the wheel can get you in trouble at school? Hmm.... What do you think?
Am I just having a "darn them whippersnappers!" moment or do you agree?
Although if I was 18 again... I have to admit I would probably try it ;)
Here are a few videos for you!
Friday, July 22, 2011
Podcasts in the classroom
Podcasting in the classroom does not have to be a scary venture! Podcasts are just .mp3 (or sound files) that can be played on any music player such as ITunes or Windows Media. Just double click on the file and it will open and play on your computer! Podcasts can be found free on your Itunes player by clicking on the podcasts link on the top right bar of your ITunes player. You can find a variety of educational podcasts from history to health and everything in between! You can then subscribe to any podcast for free and when a new podcast is uploaded to one that you are subscribed to... you automatically receive it in your podcast tab in Itunes.
Podcasts are not just for listening anymore! There are multiple ways podcasts can be used in your classroom for a more interactive learning time.
There are several programs for the PC and MAC which help you record students to allow them to create their own podcasts! Or record yourself for more personalized lessons, lessons for those who were absent (they can listen online from their home if you upload it to your school website)!
For MAC: The best program that I have used is GarageBand. You can easily cut, paste, alter sounds, add background sound effects and music and much more! I use GarageBand myself but my computers at school are PC and they do not have a PC version of this awesome software! So I tend to use a different program at school for the kids and then I will bring them home to edit and add sound effects at home with my beloved Garageband.
For PC: There are a few options for the PC. Sound Recorder which comes with Windows Vista can be used, Windows Movie Maker can be used to edit sound and video, and Audacity which is a nice free little program.
You will need a microphone as well, so don't forget!
Some classroom ideas:
* Have you or students create a script to teach a lesson:
- interview between reporter and historical figure (George Washington Podcast Package)
- be a local news radio station and present local news such as the effects of the current drought etc...
- upload to school website for absent students to listen to that days lesson
- radio station with news flash of some science breakthrough
Once you have some successful and interesting podcasts, you have the option of publishing them and even submitting them to itunes for free! One program that is free to a point is Podomatic.com
Good luck and happy podcasting!
Subscribe to:
Posts (Atom)